Scroll down to read all directions before Clicking the Pixlr Editor icon above.
Pixlr is a lot like an old version of Adobe Photoshop Elements. It can do TONS of cool stuff with existing images. Just like anything new, it can also sometimes be frustrating. It is important to remember that this should be FUN and that you should PLAY with the tools.
Here are 2 BIG things that will help you to use Pixlr.
How to Save
The Tool Box
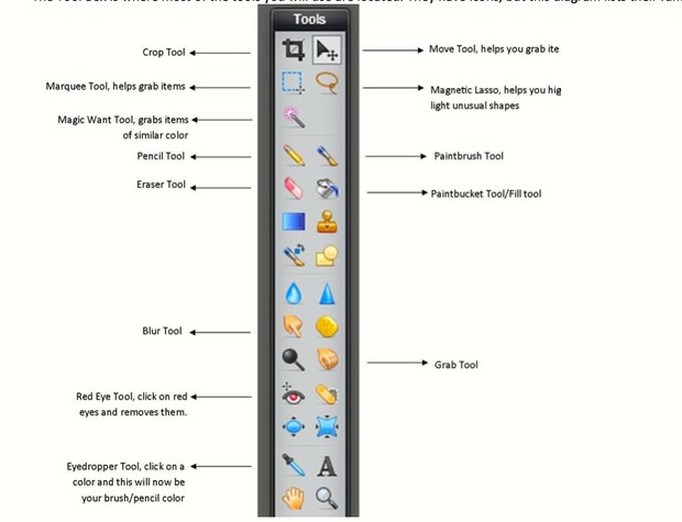
The Tool Box is where most of the tools you will use are located. They have icons, but this diagram lists their functions.
Here are 2 BIG things that will help you to use Pixlr.
How to Save
- It is VERY important to save because computers crash.
- Go to “File”
- Click “Save”
- Click “Ok”
- Save to your "Documents" folder.
- In the “File Name” field type in your file name
- Click “Save”
The Tool Box
The Tool Box is where most of the tools you will use are located. They have icons, but this diagram lists their functions.
Helpful Links
- Pixlr Basics
Watch the Pixlr Tutorial & Training video. The video consists of 32 Chapters (or mini tutorials - view the table of contents). This video is meant to teach you some of the basic Pixlr tools and techniques, most of which will be used in the following steps.
The following links lead you to tutorials on how to use the features in Pixlr.
Creating Layers
When an image is created or opened in the Pixlr, the image consists of one single layer.
- By adding more layers to your image you can build more depth and still be able to modify each layer as an individual piece of artwork.
- This tutorial will help you to understand how layers work so you can begin to manipulate images using a variety of effects.
Before you begin, please save the following files to your computer.
start.pxd
start.pxd
1. Open a layered document
First, open "Start.pxd" from the file menu in Pixlr.
***If the layers palette is not showing, choose "View" >> "Layers" from Pixlr's menu bar.
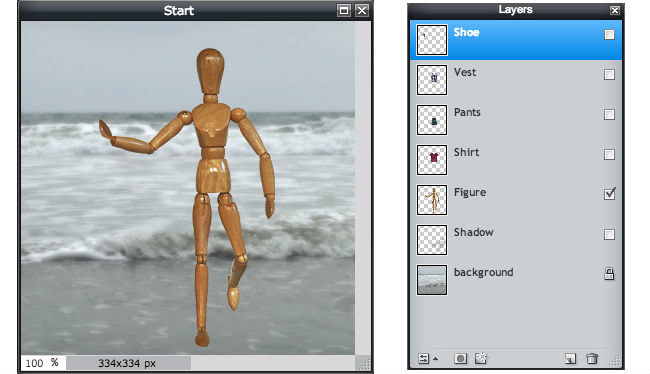
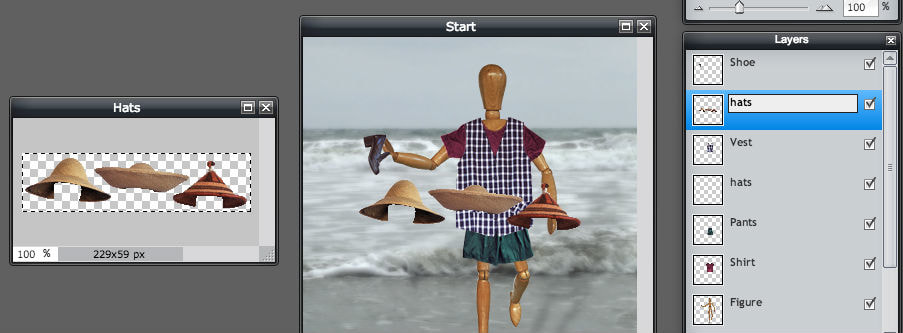
The file "Start.pxd" includes seven different layers. It has a background layer containing a beach image and several layers of clothing with transparent areas to allow the beach background to show through. A transparent area on a layer is displayed as a checkerboard pattern.
First, open "Start.pxd" from the file menu in Pixlr.
***If the layers palette is not showing, choose "View" >> "Layers" from Pixlr's menu bar.
The file "Start.pxd" includes seven different layers. It has a background layer containing a beach image and several layers of clothing with transparent areas to allow the beach background to show through. A transparent area on a layer is displayed as a checkerboard pattern.
2. View and manipulate layers in the Layers palette
- The different layers that make up the file are displayed in the layers palette. Each individual layer in the palette includes the layer name and a thumbnail of the layer's image.
- The checkmark box next to each layer allows you to make that layer hidden or visible. Click the box to uncheck it; you will notice that the actual layer in the image disappears. Click the box again to check it; the layer in the image becomes visible again.
- Select all of the check boxes in the layers palette so that all of the layers appear on the stick figure.
- A layer can be modified without changing the content on the other layers. Select a layer in the Layers palette. This layer will become highlighted, indicating that it is active and editable.
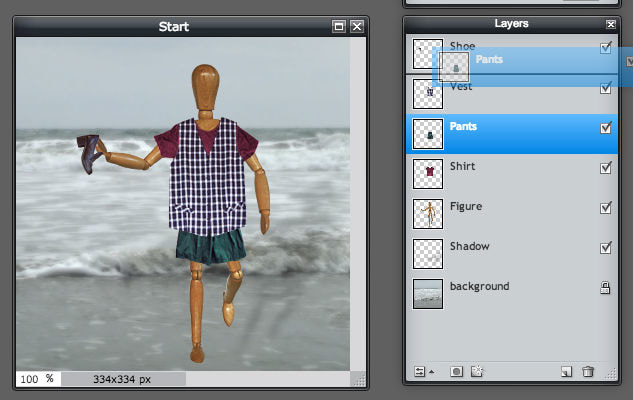
- The stacking order of the layers can be changed making certain parts of the image appear in front of or behind other layers. Click a layer in the palette to select it, click and hold down the mouse button, and then drag the layer to a different stacking position. Release the mouse button and notice the changes in the picture. Click Edit >> Undo to move the layer back to its original position.
3. Add and rename a layer
- The power of layers is that you don't have to do all image editing on one layer. To create a new layer, click the New Layer icon located in the bottom right-hand corner of the Layers palette. Note: you do not have to create a new layer when using the type or shape tool; a new layer will automatically be created once you begin to use the selected tool.
- To easily identify the contents of a layer, you may rename the layer giving it a more descriptive name. To do this, simply double-click a layer name in the Layers palette and type a new name.
- A useful skill to learn in any drawing program is how to add artwork from another image to your current image.
- With the stick figure still open, select File >> Open Image and open “Hats.gif”. Select the entire hats image by choosing Edit >> Select All in Pixlr's menu bar. Copy the image by choosing Edit >> Copy.
- Click on the Start.pxd image to make it active. Select Edit >> Paste, the hats should now appear as a layer in Start.pxd. Rename the layer "hats".
5. Edit artwork on a layer
6. Erase artwork on a layer
- Using layers offers great flexibility in that you can edit artwork on one layer without changing the content on other layers.
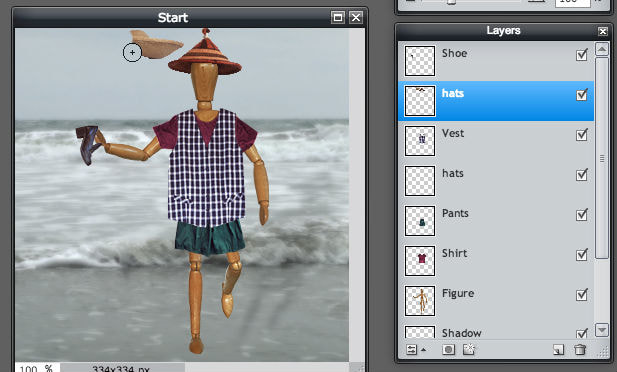
- First, select the hats layer in the Layers palette of Start.pxd to make it active.
- Next, select the move tool, click on the hats in the image and drag the hats above the stick figures head. Notice that only the hats layer is moving.
6. Erase artwork on a layer
- With the hats layer still active, select the eraser tool.
- Use the eraser to remove two of the hats. Again, notice that only the artwork on the active layer is affected and the background remains in tact. Make sure whichever hat you select is on top of the figure's head as shown below.
7. Delete a layerIf you want to remove artwork from your document you can delete the layer that the artwork is on.
Next you’ll learn to change the size of artwork or rotate artwork on a particular layer.
- Click the shoe layer in the Layers palette to make it active, and then click the Delete Layer icon located on the bottom right-hand corner of the layers palette. Notice that only the active layer and its artwork were deleted from the file.
Next you’ll learn to change the size of artwork or rotate artwork on a particular layer.
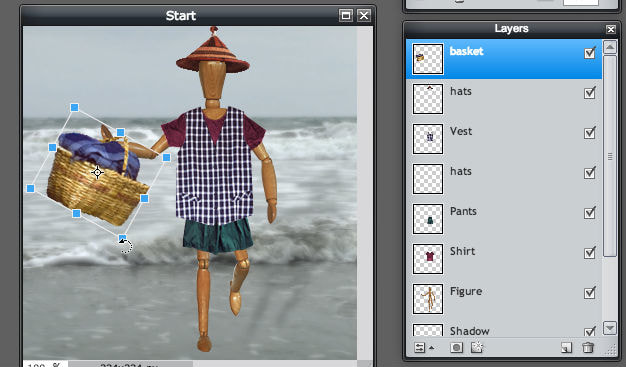
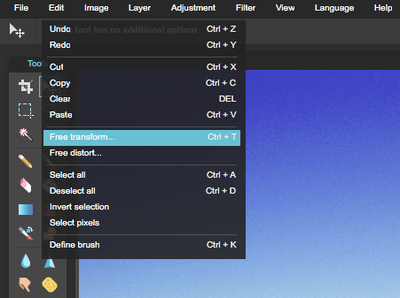
- Open "Basket.gif" in Pixlr. Bring the basket into “Start.pxd” using the technique you learned in Step 4, and name the new layer “basket”. With the basket layer active, select Edit >> Free Transform (or CTRL + T). Bounding boxes will appear around the basket indicating that it is selected.
- Hover your cursor over one of the corner boxes until the cursor becomes a rotate icon, then click and rotate the basket.
- This time click on one of the bounding boxes to expand or contract the layer. You may repeat this process until you are satisfied with the image size.
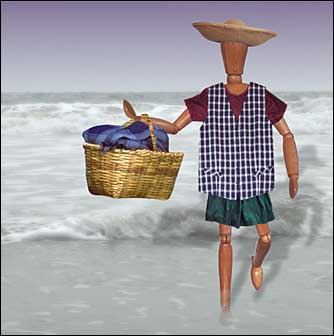
- Move the basket so the figure is holding it in their hand as shown in the image below. You will be prompted to apply the changes when you click elsewhere on the screen.
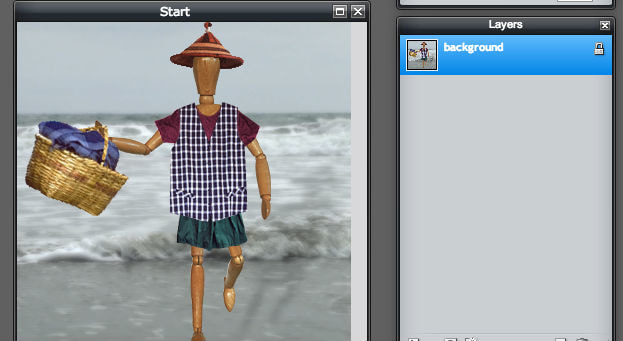
9. Flatten layers to reduce file size
Once you've finished editing all of the layers in your image, you can flatten the file's layers.
Once you've finished editing all of the layers in your image, you can flatten the file's layers.
- Flattening an image will combine all the layers into one single background layer and will greatly reduce the file size. Be aware that when you flatten an image and save it, you will lose the layers and can no longer manipulate each layer individually.
- To preserve the layers, save the file with an extension that will keep the layers separate, such as Pixlr's .pxd extension (it’s a good idea to save a copy preserving the layers first, then save a second copy flattening the layers).
To save the flattened image, choose File >> Save...
Save the file as a JPEG and name it
Save the file as a JPEG and name it
Creating Text Layers
If you would like to add text to your pixlr project, the TYPE tool is what you will need to start with.
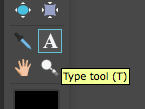
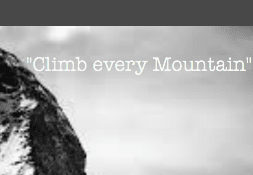
Click anywhere on your image. A New Layer will automatically be created. Type whatever you want. Your new layer will be labeled whatever text you type.
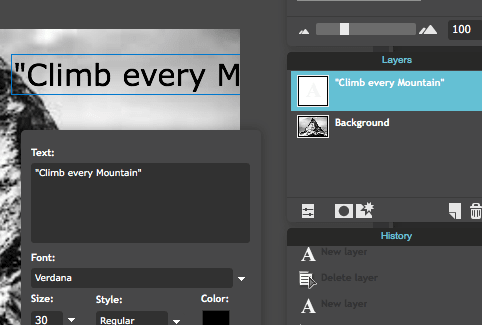
Edit your font, color and size.
Click ok.
At this point you can move your text wherever you would like on your canvas. However, you cannot use any of the transform tools or other editing tools because it is still a text format. You will need to RASTERIZE the layer.
go to "Layer" and down to "Rasterize Layer"
At this point you can move your text wherever you would like on your canvas. However, you cannot use any of the transform tools or other editing tools because it is still a text format. You will need to RASTERIZE the layer.
go to "Layer" and down to "Rasterize Layer"
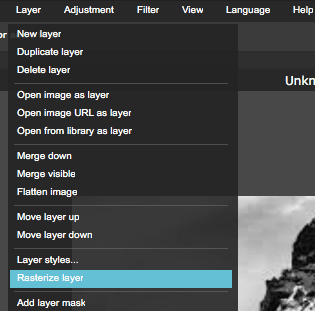
By Rasterizing a layer, it makes it into an editable layer versus a text layer. You can now use the transform, color adjustment and other editing tools.
**NOTE: be sure you are done typing any text before you rasterize. Once you do this you will no longer be able to edit the content of your text.
**NOTE: be sure you are done typing any text before you rasterize. Once you do this you will no longer be able to edit the content of your text.
Hue and Saturation
For this Pixlr Tutorial you will be experimenting with Hue and Saturation.
HUE = Color
SATURATION = How BRIGHT or DULL a color is.
Open Pixlr Editor
HUE = Color
SATURATION = How BRIGHT or DULL a color is.
Open Pixlr Editor
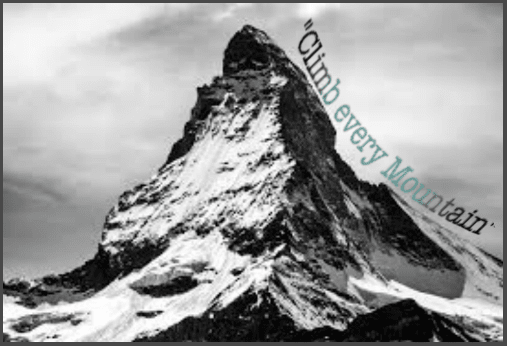
1.) Open one of the images below in Pixlr


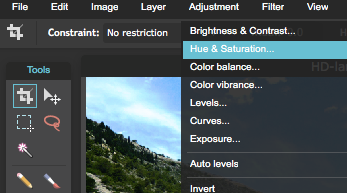
2.) Go to "Adjustments" and "Hue and Saturation"
3.) Drag your Saturation Bar all the way to the LEFT. It should read -100. Your photo is now desaturated.
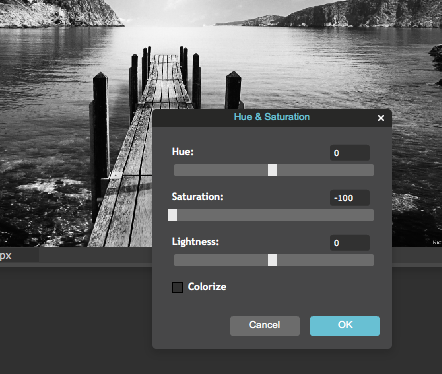
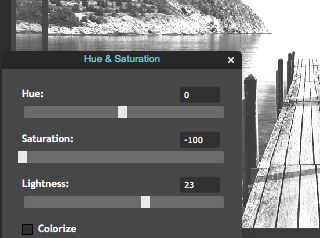
4.) Adjust the "Lightness" of your image as well so there is not as much CONTRAST
5.) Open one of the below images. Be sure to UNLOCK the background layer before you do anything else


6.) Using the Magic Wand Tool and other selection tools remove the green screen from this image and add it to your original photo.
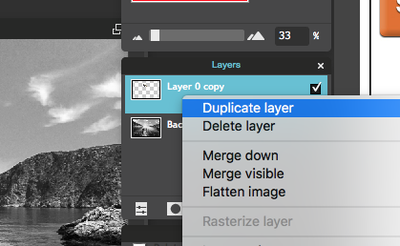
7.) Duplicate your layer so you have at least 3--From this point forward you will need to be select the layer you want to work with.
|
|
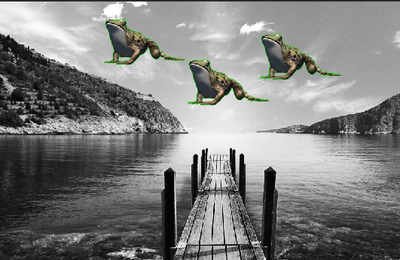
8.) Play around with the size and placement of each image so that you have an interesting composition.
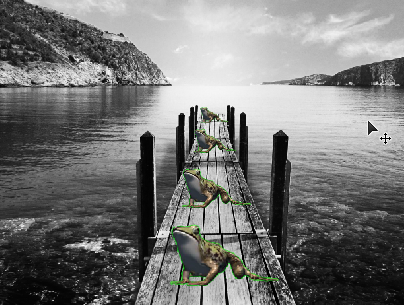
9.) For each individual image, change the HUE and SATURATION so that they all are a different color.


10.) When you are finished. "Save" and submit to Canvas for credit.
Green Screen Practice
1.) Login to Pixlr Editor
2.) Choose One of the Images Below--Save it to your computer.


3.) Go to "File"--"Open Image" to open the image you just saved
4.) Select one image with a Green Screen background from below and save it to your Computer


5.) Go to "File" "Open" to open your Green Screen image.
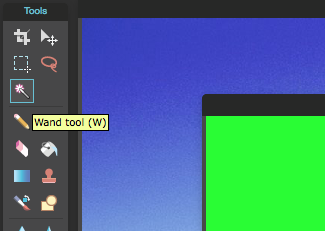
6.) Select the "Wand Tool"
6.) Select the "Wand Tool"
7.) Click on the green area surrounding the image. Once it is selected you will see a dashed line going around the green in you image.
8.) If there are areas of green remaining, hold "Shift" and select those with the wand tool as well. When you are finished there should be no green left that is unselected.
8.) If there are areas of green remaining, hold "Shift" and select those with the wand tool as well. When you are finished there should be no green left that is unselected.


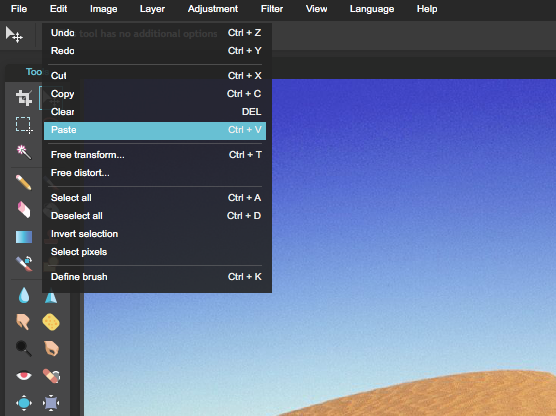
10.) Go to "Edit"--"Copy" to copy your selection.
11.) Switch back to your original image and go to "Edit"--"Paste"
11.) Switch back to your original image and go to "Edit"--"Paste"
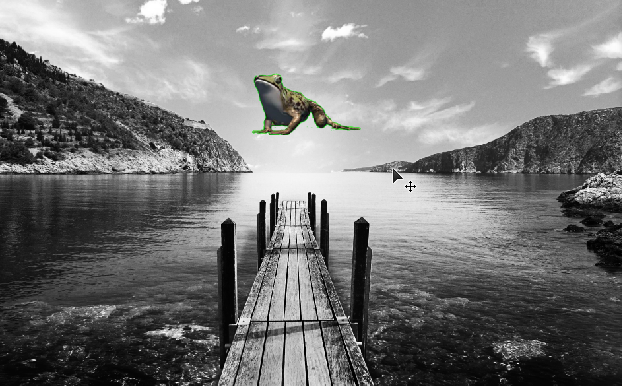
12.) The image you selected should now appear on your background (Far Left Image)
13.) You will also see that a "New Layer" as appeared in your Layers Window (Center Image)
13.) Go to "Edit"--"Free Transform" to change the size and rotation of your image (Far Right Image)
14.) The "Move Tool" allows you to change the placement (arrow icon)
13.) You will also see that a "New Layer" as appeared in your Layers Window (Center Image)
13.) Go to "Edit"--"Free Transform" to change the size and rotation of your image (Far Right Image)
14.) The "Move Tool" allows you to change the placement (arrow icon)


***HINTS!
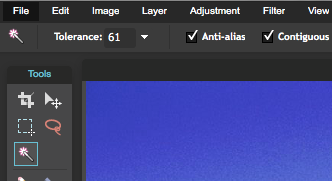
1.) When selecting your green areas, adjust the "Tolerance" Bar in the upper left corner of your screen to change the sensitivity of your "wand tool".
1.) When selecting your green areas, adjust the "Tolerance" Bar in the upper left corner of your screen to change the sensitivity of your "wand tool".
2.) There are other selection tools to help you select areas of your image if the Wand Tool is not working.
- Marquee Tool (Left)
- Lasso Tool (Right)
- Marquee Tool (Left)
- Lasso Tool (Right)


